Popups and Forms Source
When you want to capture high-quality emails, you can choose from a variety of popups and form options directly within your LeadsWithDemos site.
Our popups and forms are specifically designed to give access to unique gated content or lead magnets, such as our custom-trained AI Assistant, newsletter signup, “Save Recipe for Later” feature, and more. These elements help you turn casual visitors into engaged subscribers by offering real value in exchange for their email addresses.
Please note that the available settings and components may vary based on the type of lead magnet or gated content you choose. This flexibility allows you to tailor the experience to best fit your campaign goals and the interests of your audience.
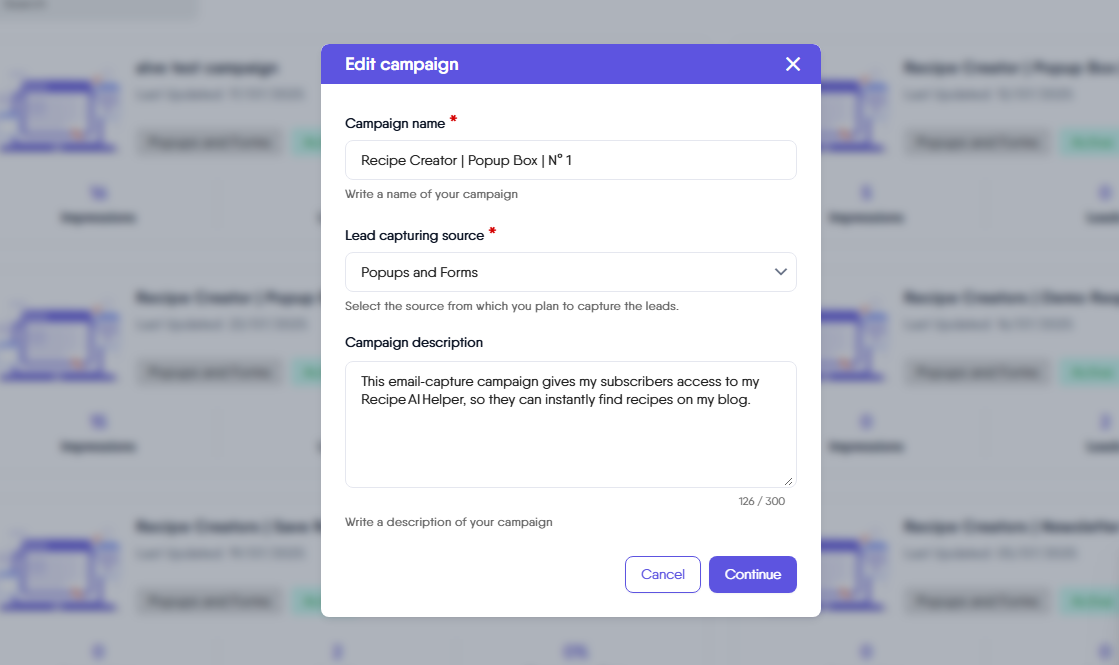
After adding your campaign name, selecting the lead capturing source, and providing the campaign description, for example: choosing Popups and Forms, you can proceed by clicking the “Continue” button.
Next, you’ll enter a guided process that walks you through each step required to set up your email capture campaign. During this process, you’ll have the opportunity to define and customize each component needed to begin collecting emails. These guided steps include:
Lead Caputing
In this step, you will select the email capture form or popup that you would like your users to interact with. In the dropdown list, you will only see the popups and forms that are available within your LeadsWithDemos site, are not part of or linked to another LeadsWithDemos campaign, and, most importantly, are marked as “Lead Gen Form” under Site > Popups & Forms.
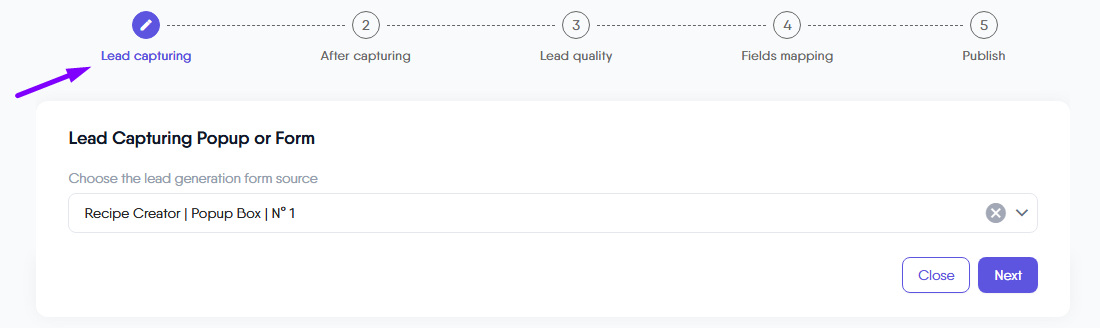
Once you have selected the popup or form that you want your users to interact with, you can click on “Next,” which will take you to the next step.
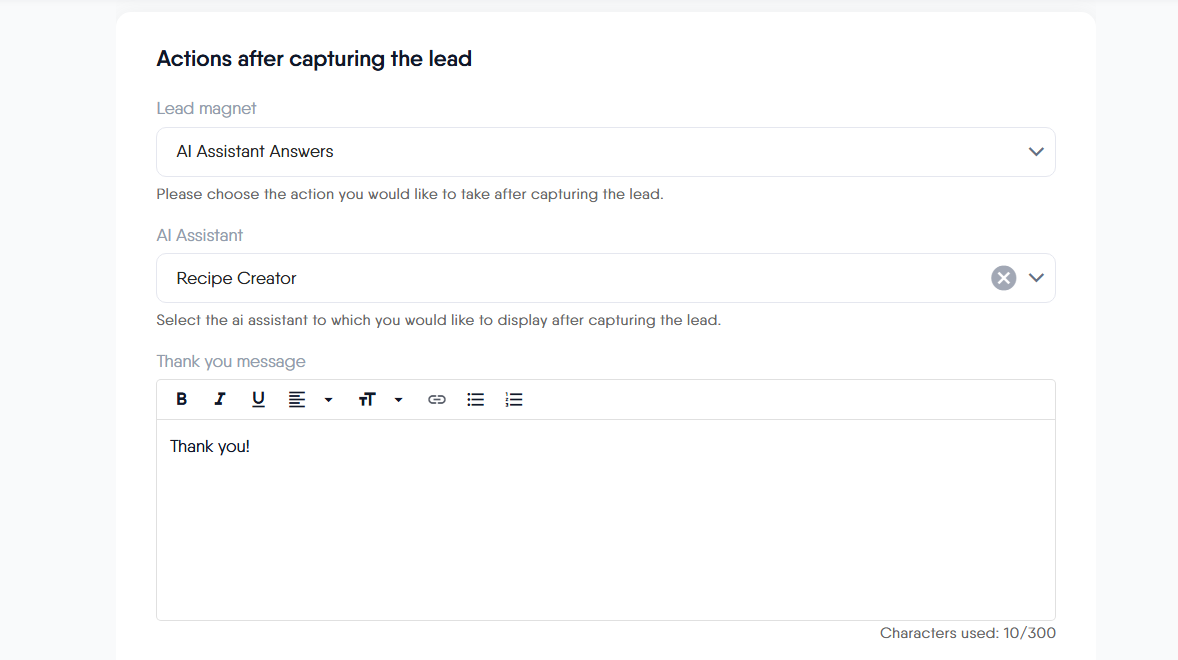
After Capturing
The “After Capturing” step allows you to define what happens after a subscriber submits the form. These actions can vary based on the specific lead magnet or gated content you offer within your LeadsWithDemos site.
Below, we’ll outline the unique lead magnets (your gated content options) available in LeadsWithDemos, along with the corresponding actions you can configure for each one.

Lead Magnet
LeadsWithDemos is an email marketing platform designed to help you attract and capture emails through engaging and interactive lead magnets or gated content. These offerings go beyond traditional static downloads, allowing you to deliver content and value in real time. Current options include custom-trained AI Assistants, newsletters, or features like “Save Recipe for Later”. This empowers you to enhance your marketing strategy and connect more effectively with your audience.
The current unique lead magnets available in LeadsWithDemos are:
AI Assistant Answers
With LeadsWithDemos, you can train a custom AI assistant, using your own knowledge. This assistant can serve as a powerful lead magnet or gated content, instantly providing personalized answers to your subscribers’ questions after they submit your form.
Think of the “AI Assistant Answers” lead magnet as a smarter alternative to traditional content like eBooks, white papers, recipe finders, or written courses. Instead of asking users to read through lengthy documents or browse your website, your custom-trained AI delivers instant, conversational responses tailored to each user’s needs. This interactive experience helps keep your audience engaged, guides them in real time, and offers immediate value at the moment their interest is highest.
You have full control over the knowledge you provide to the AI assistant, and you can update or expand its expertise at any time, ensuring accurate, relevant, and evolving support for your subscribers.
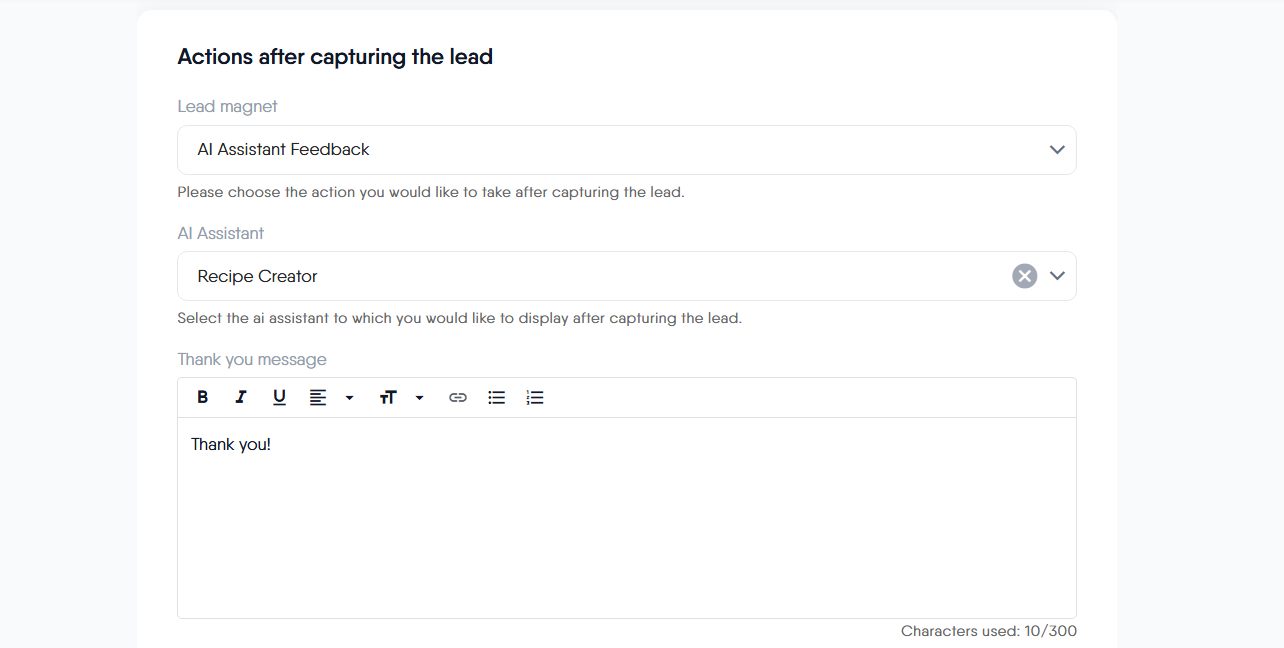
AI Assistant
This dropdown list allows you to choose the specific AI assistant you want your subscribers to engage with. The selected assistant will leverage the custom knowledge you’ve trained it with to provide relevant information and instant answers after your visitors submit the form.
Thank You Message
This text box allows you to customize the message displayed to the subscriber after they have submitted the form. The thank you message presents an opportunity to express appreciation, reinforce brand engagement, and guide the subscriber on what to expect next, thereby enhancing their overall experience.
Traditional Form Submission
The Traditional Form Submission lead magnet is designed to capture email addresses from visitors who want to subscribe to your newsletter or access gated content. This could include resources such as PDF guides, eBooks, whitepapers, checklists, and more.
This lead magnet is particularly useful for placement within blog articles or recipe pages, where you can encourage users to fill out the form to save content such as recipes for later or have it sent directly to their email.
Action after form submission
This dropdown list lets you choose what happens after a form is submitted. Available actions include:
- Send leads to a landing page: Redirect your subscribers to a thank you landing page after form submission. The thank you page is a custom landing page created within your LeadsWithDemos site. Once you select “Send leads to a landing page” during your campaign setup, the “Choose custom landing page” dropdown will appear, allowing you to pick the name of your custom page.
- Redirect to a custom URL: Enter a custom URL to send your subscribers to once they have submitted the form.
- Display a thank you message only: This option displays the thank you message, which will remain visible until the subscriber refreshes the page.
Thank You Message
This text box allows you to customize the message displayed to the subscribe after they have submitted the form.
AI Assistant Feedback
When you use a custom-trained AI assistant as a unique lead magnet or gated content in your LeadsWithDemos site, there may be times when the assistant cannot provide a correct or complete answer. To address this, you can enable the “AI Assistant Feedback” option during campaign setup to collect feedback directly from your visitors or subscribers via the chat interface.
After the assistant provides an instant answer, you can display a feedback prompt in the chat, asking subscribers whether their question was resolved. If they respond negatively, this action triggers your campaign to collect additional feedback such as their name, email address, and any details you wish to gather.
This approach not only helps you collect valuable insights to improve your AI assistant, but also gives you the opportunity to follow up with subscribers and provide them with the correct answer, strengthening engagement and trust.
AI Assistant
This dropdown list allows you to choose the specific AI assistant you want your subscribers to engage with.
Thank You Message
This text box allows you to customize the message displayed to the subscribe after they have submitted the form.
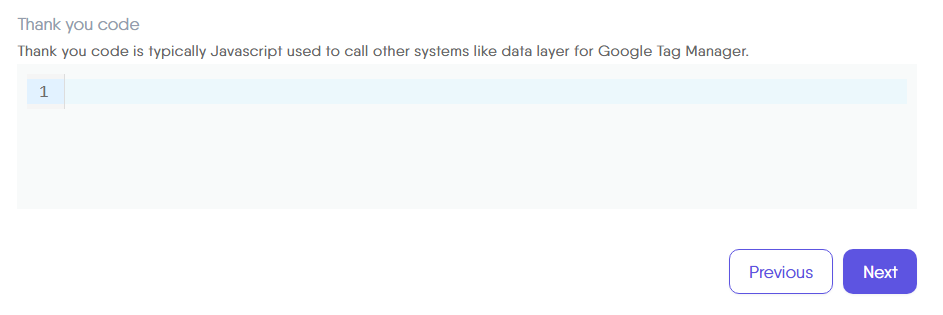
Thank You Code
This section allows you to add custom JavaScript that runs after a form has been submitted. Typically, this JavaScript is used to integrate with external systems for example, to trigger data layers for Google Tag Manager, track conversion events, or connect with analytics tools.
By adding your own code here, you can extend your form’s functionality and gain deeper insights into user actions. This feature is ideal for tracking form events.
Once you have selected your desired lead magnet, you can proceed to the next step by clicking the “Next” button.
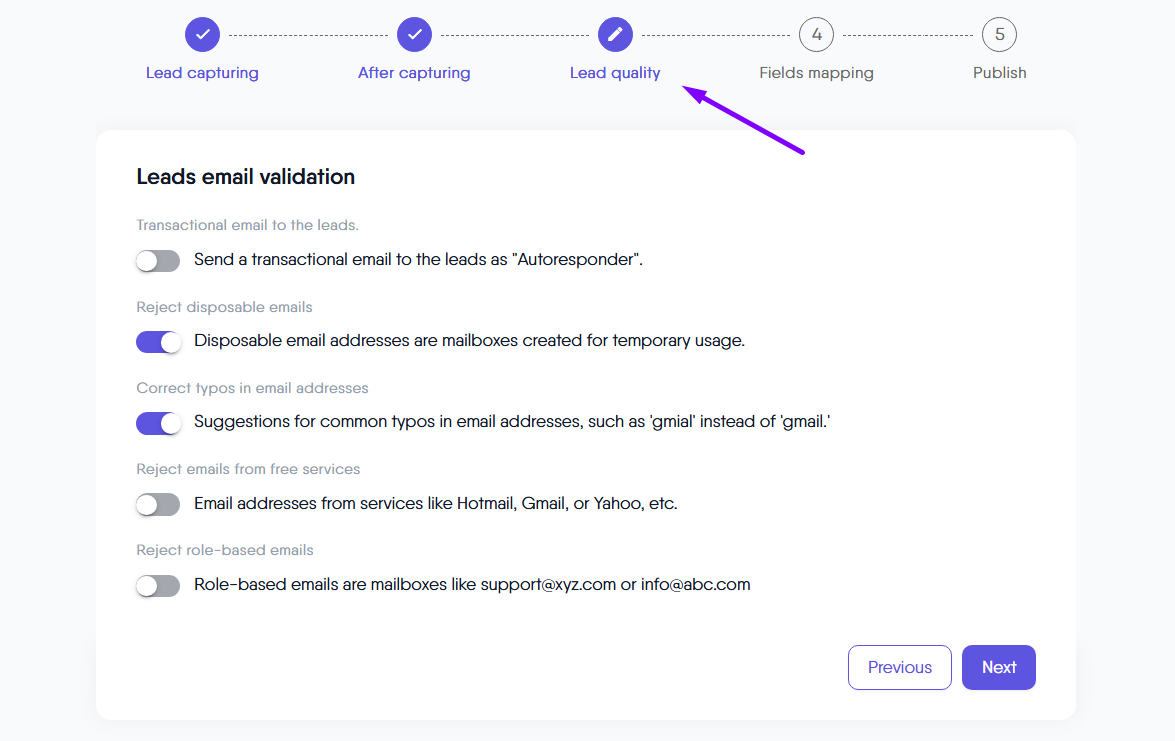
Lead Quality
In this step, you will define and implement strategies to verify the validity of the email addresses provided by your subscribers. This process is crucial for ensuring the quality of the captured email addresses. The strategies include:
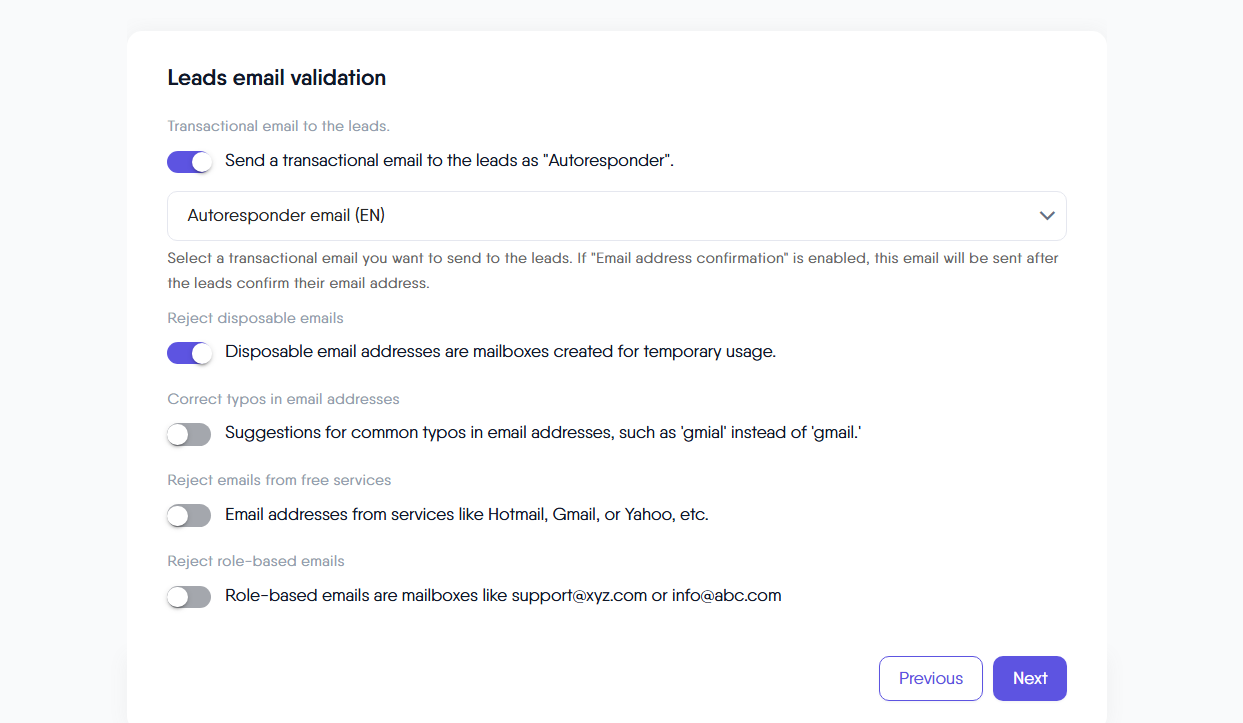
Transactional Email to Leads
You can choose to toggle this feature on or off, depending on your campaign needs. For example, if you enable it for the “AI Assistant Answers” lead magnet, the system will automatically send the active automated email from the “Autoresponder” category.
It’s important to ensure that the correct automated email is toggled on within this category, as only one email per category can be sent at any given time. This helps avoid duplicates and ensures that only the intended message reaches your subscribers.
This feature is especially useful if you want to confirm the authenticity of your subscribers’ email addresses. After someone provides their email and subscribes, you can send them an autoresponder email containing the gated content you offered as a lead magnet. This not only delivers value instantly but also helps verify that users receive messages at a valid address, improving the quality of your email list and your follow-up opportunities.
Reject Disposable Emails
This toggle option allows you to automatically reject email addresses from temporary email providers.
Correct Typos in Email Address
Enabling this option helps in automatically correcting common typos in email addresses, thus enhancing data accuracy.
Reject Emails from Free Services
Toggle this option to decline email addresses from free email services, if needed for your campaign’s strategy.
Reject Role-Based Emails
This feature, when toggled on, prevents the acceptance of emails associated with generic roles (like admin@, support@) rather than individual users.
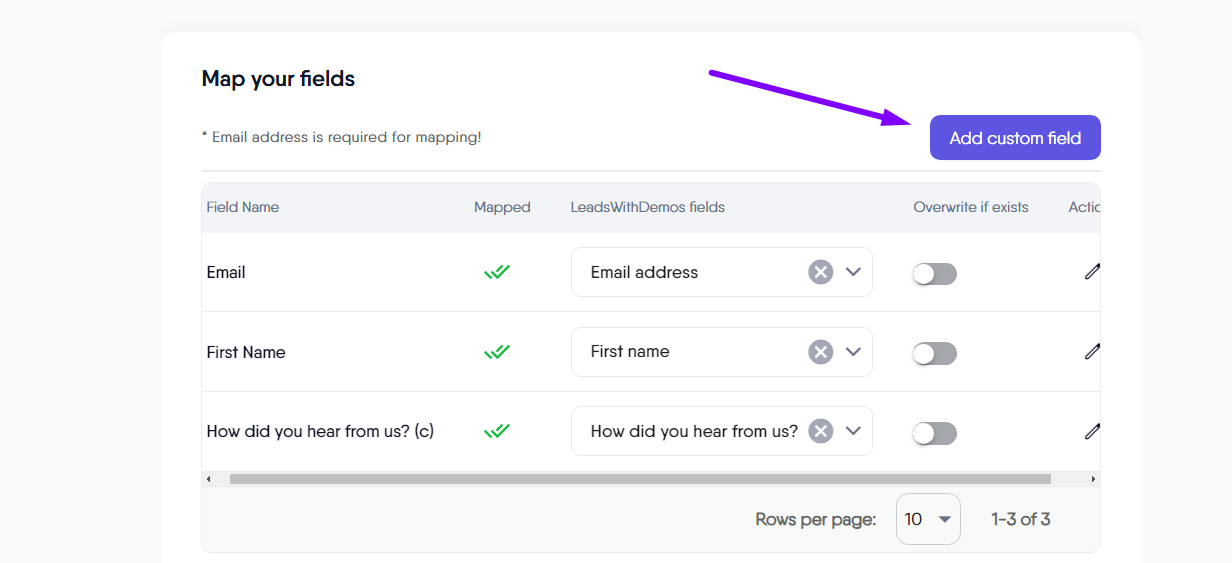
Fields Mapping
Fields Mapping helps you review and connect the information collected from your popups and forms to the custom fields within your LeadsWithDemos site. By doing this, you ensure that details like names, emails, preferences, and other important data flow seamlessly into the right places.
The mapping table is organized into columns:

Field Name
Lists the names of your form fields from your form.
Mapped
Shows the mapping status of each field.
LeadsWithDemos Fields
This section displays the available custom fields to help you review and map your form fields accurately. If needed, for each form field, select the corresponding custom field to ensure all data is transferred correctly to your subscriber or lead profile within your LeadsWithDemos site.
This section displays the available custom fields, allowing you to review and accurately your form fields. For each form field, select the corresponding custom field if needed to ensure all data is correctly transferred to your subscriber or lead profile within your LeadsWithDemos site.
This mapping process is essential for keeping your subscriber database accurate and up to date. By ensuring every piece of data is properly aligned, you’ll be able to take full advantage of your LeadsWithDemos site features, such as segmentation and audience targeting. If your form includes unique fields that aren’t already in your LeadsWithDemos site, you can easily add new custom fields and include them in your mapping. This flexibility gives you greater control over the information you collect and how it’s managed.
Overwrite if exists
Provides an option to overwrite existing subscriber data with new submissions, keeping your lead information current.
Action
This column provides the option to add additional configurations for each field. When you click the pencil icon, a popup window will appear offering the following options:
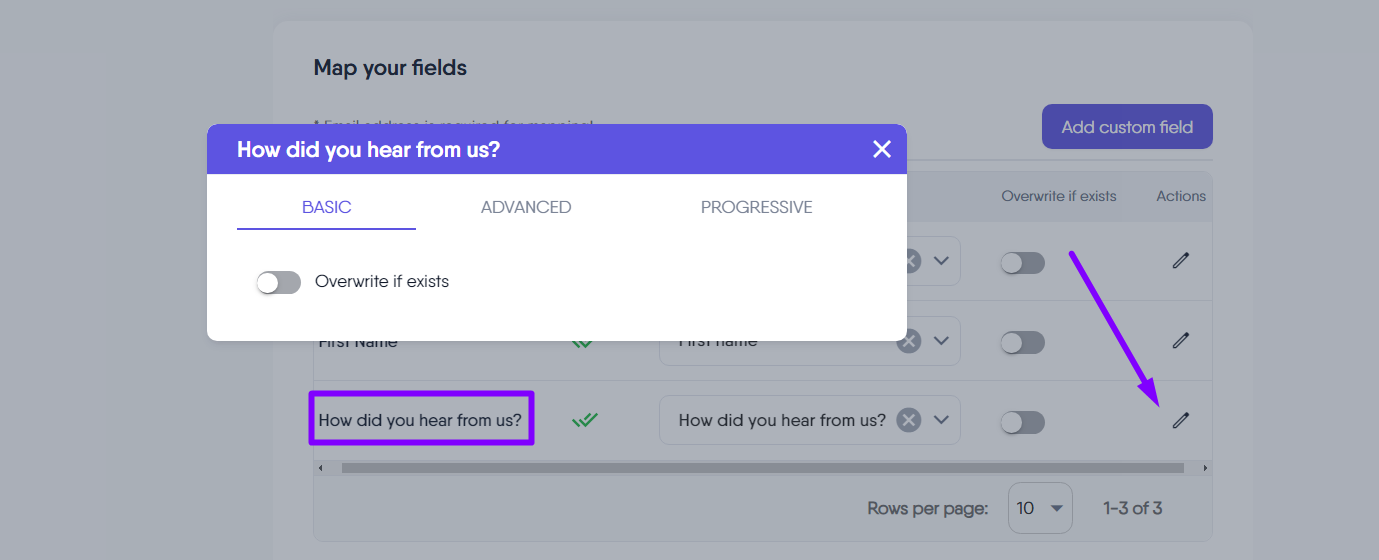
Basic
Overwrite if exists: This toggle allows you to choose whether to overwrite existing field data. If enabled, the data will be updated with the new submission when the form is submitted.
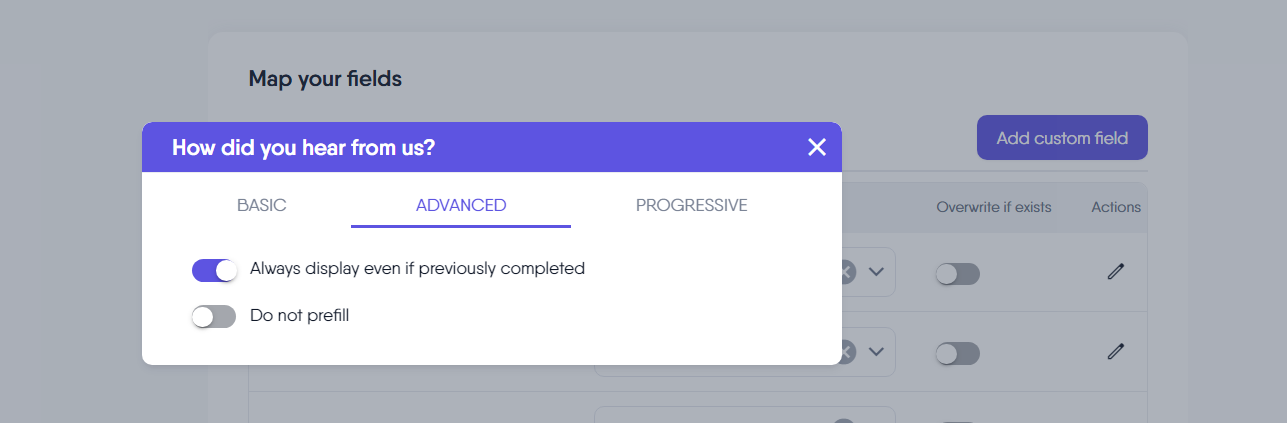
Advanced
Always display even if previously completed: This toggle enables the field data to always be displayed on the form, even if the subscriber has already completed it in a prior submission. If toggled on, the field data will be displayed.
Do not prefill: If this option is enabled, the field will not be prefilled with any previously entered information, allowing the subscriber to input their data from scratch. If toggled off, the system will display the data entered previously.
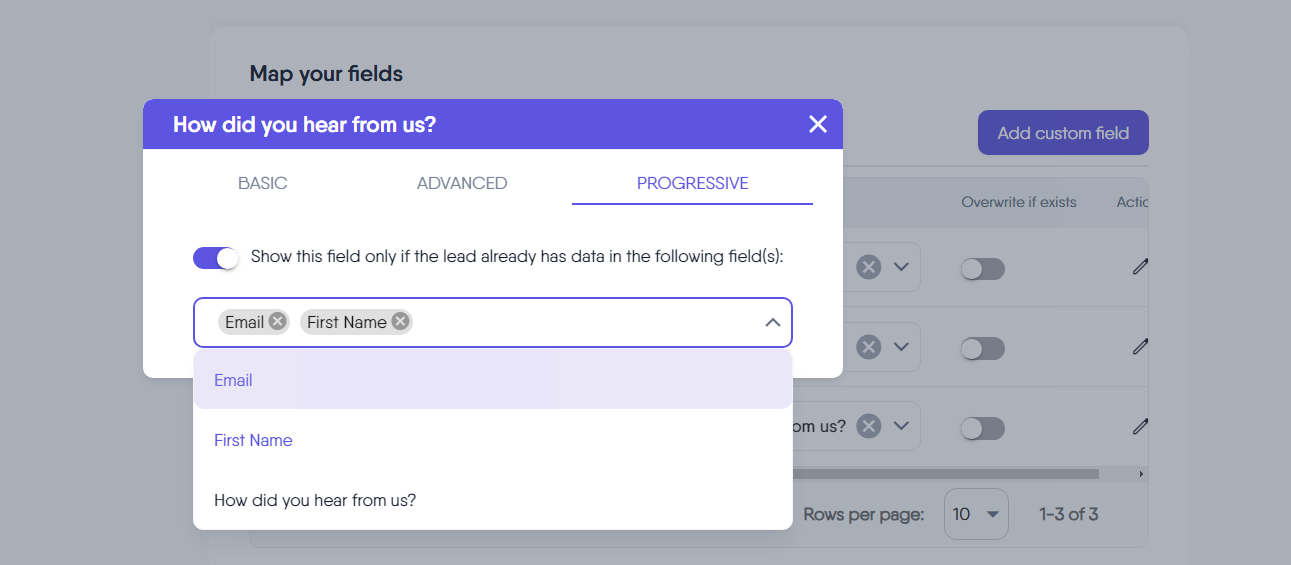
Progressive
Show this field only if the subscriber already has data in the following field(s): This toggle allows you to specify conditions under which this field will be displayed. You can select one or more fields, such as “Email” or “First Name,” and the designated field will only appear if the subscriber has previously populated data in those selected fields.
This is a powerful configuration option because it allows you to collect data progressively each time your subscribers interact with your forms. This approach removes the barriers of asking many questions at once.
Adding Custom Fields
If your form includes unique fields not present with your LeadsWithDemos site, you can create new custom fields directly from the “Map Your Fields” section or via ‘Leads’ > ‘Settings’ > ‘Custom Fields’ > ‘Add Custom Fields‘. This ensures you capture all necessary subscriber data.
Once you have completed the field mapping, you can proceed to the next step by clicking the “Next” button.
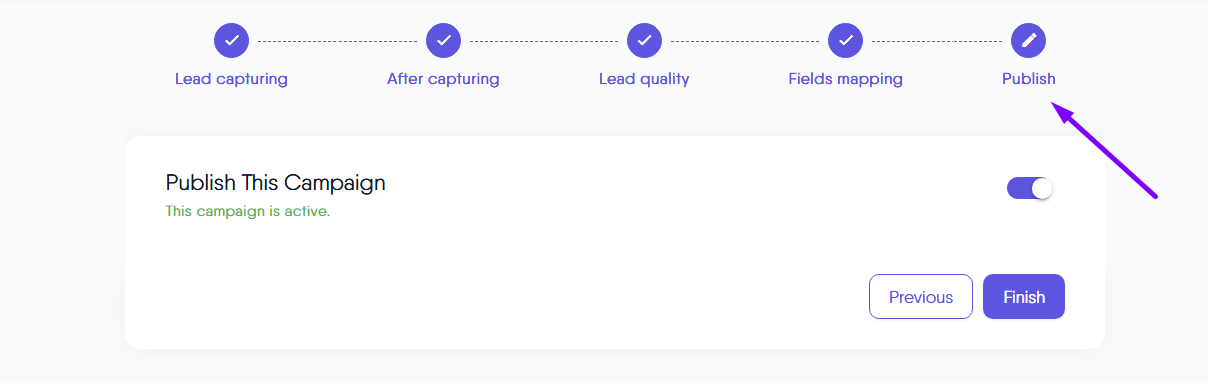
Publish This Campaign
In this step, you will publish your LeadsWithDemos email capture campaign. Once you toggle the option to publish, the campaign will become active. After clicking the “Finish” button, you, as the LeadsWithDemos user, will be redirected to the campaign dashboard.
If the campaign is not yet active, a notification will indicate its status. Ensure that all previous steps are completed to guarantee a successful launch.